Pages

Wednesday, June 20, 2012

Tortillas

Ingredients:

Whole Wheat Flour - 1 Cup
All Purpose Flour    - 1 Cup
Coconut Oil (Melted) - 1/4 Cup
Salt (I use sea salt) - 1/2 teaspoon
Warm Water - 3/4 Cup or less

I normally just use a recipe as guidelines.  If you prefer a more whole wheat tortilla, use more or all whole wheat flour.  If you prefer white tortillas, then use all all-purpose flour.  If you don't think you like coconut oil (I just started using coconut oil and I LOVE it, it doesn't have a coconut taste if you use the expeller pressed like this one), you could substitute olive oil, vegetable oil, or butter.  I did make this recipe with olive oil and I thought it could have used a little less than 1/4 cup.

To make your tortillas:

In a large bowl, mix together the flour and the salt.  Next mix in the coconut oil, making sure that it is fully incorporated.

Add in the warm water a little at a time and stir.  Your dough should be very moist but not overly sticky.  Add in just enough water to form a very soft ball.

Next, on a very lightly floured surface, roll your dough in to a log.  Using a knife or a pastry scraper, portion the dough in to about 10 golf ball size portions.

Cover the portioned balls and allow them to rest for at least 30 minutes or up to 4 hours.  This will give the gluten in the bread time to relax and give a better consistency and taste to your tortillas.

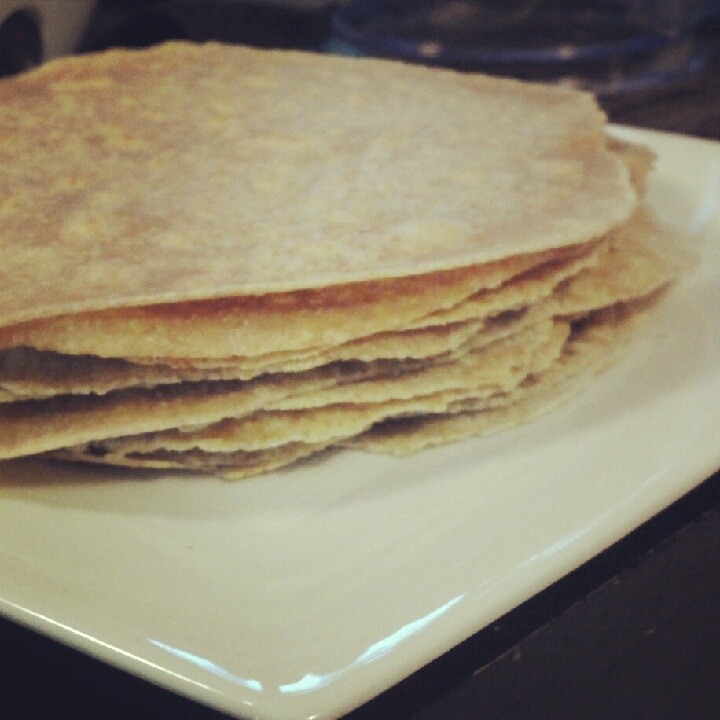
After your dough has rested, and working with one ball of dough at a time, flatten the dough with the palm of your hand.  This will form a little disc.  Then with a floured rolling pin, roll each ball thin (between 1/16" and 1/8").  These will not rise at all, so the thickness you roll them will be the thickness of your final product.  Continue with the rest of the dough, stacking them on a plate as you go along (they will not stick together). 

After you are done rolling the dough, heat a large frying pan or griddle pan on low heat.  Lightly fry each tortilla (don't oil the pan, I cook with stainless steal and there is enough oil in the dough for it to not stick) for about 30 seconds to a minute on each side.

These will last for a couple of weeks in the fridge, or freeze very nicely.

Tuesday, June 19, 2012

Granola

I’m sure I’m not the only one that looks at my checking account and says, “where did all of my money go”.  So one day I sat down and noticed that a large portion of my paycheck gets spent at the grocery store, considerably more than we even spend on car payments.  In an effort to try to save some money on my grocery bill, and of course as always, make sure that my family is eating healthy, I decided to try to make most of what we eat from scratch.  One of the first things on my list was granola.  Here is what you will need, but feel free to switch it up.  The only thing I tend to keep pretty constant is the amount of oats and sweetener.  (Pictured is a double recipe.)

Ingredients:

Rolled Oats – 2 cups
Wheat Germ  – ½ cup
Chopped Almonds  – 1 cup
White Chocolate Chips – ½ cup
Raisins  – ½ - ¾ cup
Pure Maple Syrup – ½ cup
Honey – ¼ cup
Melted Coconut Oil  – 2 tablespoons
Ground Cinnamon – 1 teaspoon

Preheat oven to 350 degrees.  Combine first 3 ingredients and toast on a cookie sheet for about 15 minutes, stirring occasionally.  Once toasted, remove from the oven and allow to cool slightly (if you mix the rest of the ingredients while the oats are hot, it will melt the white chocolate).  Reduce the heat to 300 degrees.

In a separate bowl, combine the remaining ingredients except for the raisins and white chocolate.  Line a 9x9 cake pan with tinfoil and lighting oil the pan with coconut oil.

Next combine all of ingredients in a bowl.  Dump the mixture in to the prepared pan and press firmly in to the pan.  Bake for about 25 minutes.

Allow to cool and break apart, or cut in to squares.  The tinfoil will help you pull the granola out of the pan easier. 

Because this is not full or preservatives you will need to keep this in an airtight container and you should eat it within a week.  Whatever you are not going to eat with in the week can be stored in the freezer.

Don’t be afraid to be creative with your granola.  The possibilities are endless!  My favorite is switching ground flax seed for wheat germ, dried cranberries for raisins, and leaving out the cinnamon.

Monday, June 18, 2012

Strawberry Jam


When I decided that I wanted to make jam, I knew that I didn’t want to use any sugar or pectin, but I wanted it to be really tasty.  So I found a recipe on one of my favorite blogs and modified it to my taste.  You can certainly use sugar if you would like.  The recipe is pretty basic, and then you can add other flavorings.


Here is a list of some sugar substitutes:
Honey
Agave Nectar
Maple Syrup
Molasses

This is where I purchased my jars.  Most of the jars are able to be used for canning.  I plan on giving these away as gifts, so I wanted to have some nice jars.  The shipping is pretty high, so if you want to make an order it might be a good idea to do a group order with some friends.

Basic Recipe:
Fresh Local Strawberries – 3 pounds
Apple – pealed and shredded  (apples contain a lot of natural pectin!)
Lemon – half
Sugar in some form listed above – 2 cups


Combine all ingredients and mash together.  Heat on med-high heat until the mixture is boiling.  Boil until the jam gets to the jelling stage (this took me about an hour), stirring frequently.  You can test the jam by putting a plate in the freezer and spooning a small amount of jam onto the chilled plate.  If you can push it with your finger and it is thick then it is good.  At this point you can take the jam off of the heat and either ladle hot jam into sterilized jars and process in a water bath for 10 minutes, removing from the water and allowing to rest for 12 hours; or you can let the jam cool, ladle in to containers and freeze.  Because of the low sugar content of this jam it will only keep in the refrigerator for 2-3 weeks, but I don’t think that will be a problem.  We have never been jam eaters, but since having made homemade jam, we haven’t kept a jar for more than 2 or 3 days.


Modifications:

Strawberry Maple Jam

Follow directions for basic recipe, using maple syrup as the sugar.  During the last couple of minutes of cooking, add 2 teaspoons of cinnamon.  Process as listed above.


Strawberry Vanilla Jam

Follow directs for basic recipe, using agave nectar as the sugar.  While cooking, split a vanilla bean down the middle.  Scrape the insides from the bean and add both the bean and the insides to the jam mixture.  Once you take the jam off of the heat, carefully take the bean pod out of the jam* and add 1 tablespoon of pure vanilla extract.  Stir and process as listed above.

I purchased my vanilla beans from Amazon.com.  They are really great quality and you can't beat the price.  At the grocery store you will pay about $5 a piece for vanilla beans.  Through Amazon I got about 50 (I think it was actually 52) beans for $24.99.  Lets do that math.  $24.99/50 = .4998, or about $.50 each.  That is 10 times cheaper! 
* Save the spent bean pod for another application.  Just rinse off jam, allow to dry and store in an airtight container.


Honey Wheat English Muffins

Ingredients:
Active Dry Yeast – 2 Teaspoons
Honey – 2 Tablespoons
Warm Water (around 110 degrees) – 1 Cup
Milk – 1 Cup
Butter – 4 Tablespoons
Whole Wheat Flour – 2 Cups
Bread Flour – 3 Cups +/-
Salt – 1 ½ Teaspoons
Cornmeal – ½ Cup +/-
Olive Oil or Cooking Spray

In a small bowl, combine the yeast, honey and 1 cup of warm water. Stir to dissolve the honey and yeast. Let sit about 5 minutes or until foamy on top.

While the yeast/honey mixture is resting, combine 2 cups of the whole wheat flour, 1 cup bread flour and salt in a large bowl. Stir well to evenly distribute the salt. In a second small bowl, combine the milk and butter.   Warm the milk and butter in the microwave until the butter has melted.

Pour the yeast mixture and the milk mixture into the flour. Stir until combined. Adding 1/2 cup bread flour at a time, stir in more flour until the dough forms a soft, slightly sticky ball.  Do not over mix as this will make your muffins tough.  You may need to use more or less that the listed amount of flour.  You can also use any combination of flours.  I liked the bread flour because I feel like it yields a much softer English muffin.

I used my Kitchenaid mixer with my dough hook on the low setting and let it go for 5 minutes.  You can also knead the dough by hand for 5 minutes.

Shape the dough into a ball and place it in a bowl that has been lightly coated in olive oil or cooking spray.  Let rise until double in size.  This should be about 45 minutes to an hour.

Punch the dough down, shape it into another ball, cover the bowl and let rise for a second time.

Punch down the dough again and lightly flour your workspace. Using a rolling pin, lightly roll the dough until it is about ½ to ¾  inch thick. Using a cookie cutter, biscuit cutter, or round glass cut the dough into circles.

Place the cut dough circles onto a sheet pan that has been liberally covered in cornmeal.  You don’t want to use too much because it will burn later, but you need enough for it to not stick to your pan.  Do not crowd the pan as the muffins will expand in size and you will need to remove them without losing the air in them.   Sprinkle more cornmeal on top of the muffins. Cover loosely with a damp towel and let rise for the last time, about an hour.

Heat a large skillet over low heat. Spread a very small amount of olive oil around the bottom of the pan with a paper towel, or use cooking spray.  Carefully transfer muffins to the skillet with a spatula, being careful not to deflate them. Cook the muffins, in batches, in the skillet until they are golden brown and crispy on each side. Do not rush this process.  It should take about 5 minutes on each side.  You will know when they are done if you can tap the top and it sounds hollow.

Allow to cool and store in an airtight container.  I keep mine in the fridge so that they stay fresh longer.  These also freeze beautifully.  You can half this recipe if you would like.  I usually end up with about 25 muffins.

My favorite way to eat these is toasted,  with fresh ground all natural peanut butter and homemade jam, YUM!

Look back for my post on homemade strawberry jam!